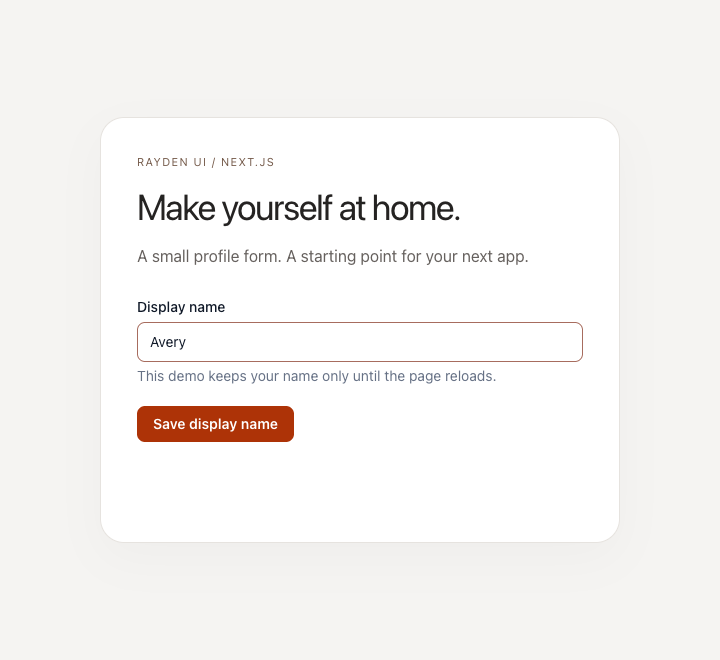
How does Rayden work with Next.js?
Install @raydenui/ui, import @raydenui/ui/styles.css in your root layout, and use a Client Component for interactive UI. Your page and layout can stay as Server Components. Rayden ships compiled styles, so this example needs no Tailwind configuration.
You’ll build a profile form that accepts a display name and confirms the change. It uses Rayden’s Input and Button, native form submission, and React state. The name stays in memory and resets when you reload; there is no account service or database.
Example versions: Rayden UI 0.10.1, Next.js 16.3.6, React 19.3.0. Use Node.js 22 LTS or newer and npm. Already have an App Router project? Start with the Rayden install below and adapt the files to your existing layout.
01. Install Rayden UI
For a fresh project, the download above includes every file in this guide and a dependency lockfile. Unzip it, open the nextjs-profile folder in your terminal, then run:
npm ci
npm run dev
To follow along in a new app of your own, run npx create-next-app@latest my-rayden-app. Choose TypeScript and App Router. The example uses a root-level app directory and plain CSS. If you choose a src directory, put the files below in src/app instead.
Inside an existing or freshly created Next.js project, add the tested Rayden version:
npm install @raydenui/ui@0.10.1You don’t need a Rayden provider for the two components used here. Consult the documentation when adding components with their own provider requirements.
02. Import the component styles once
Load Rayden’s stylesheet from the root layout, followed by your app’s global styles. In an existing project, keep your metadata, fonts, and providers; add the imports to your current layout.
import type { Metadata } from "next";
import "@raydenui/ui/styles.css";
import "./globals.css";

export const metadata: Metadata = {
  title: "Profile settings | Rayden UI",
  description: "A Next.js profile form built with Rayden UI.",
};

export default function RootLayout({ children }: { children: React.ReactNode }) {
  return (
    <html lang="en">
      <body>{children}</body>
    </html>
  );
}
Keep layout.tsx on the server. Next.js supports importing external CSS in the App Router, and the form will define its own client boundary.
03. Create the interactive form
Add app/profile-form.tsx. The "use client" directive belongs before the imports because this component uses state and event handlers.
"use client";

import { useState, type FormEvent } from "react";
import { Button, Input } from "@raydenui/ui";

export default function ProfileForm() {
  const [name, setName] = useState("");
  const [savedName, setSavedName] = useState("");

  function handleSubmit(event: FormEvent<HTMLFormElement>) {
    event.preventDefault();
    const trimmedName = name.trim();
    if (!trimmedName) return;
    setSavedName(trimmedName);
  }

  return (
    <form className="profile-form" onSubmit={handleSubmit}>
      <Input
        id="display-name"
        name="displayName"
        label="Display name"
        autoComplete="nickname"
        placeholder="How should we call you?"
        value={name}
        onChange={(event) => {
          setName(event.target.value);
          setSavedName("");
        }}
        maxLength={60}
        required
        helperText="This demo keeps your name only until the page reloads."
      />
      <div className="profile-actions">
        <Button type="submit" variant="primary" disabled={!name.trim()}>
          Save display name
        </Button>
      </div>
      <p className="profile-status" role="status">
        {savedName ? `Looking good, ${savedName}. Your demo profile is updated.` : ""}
      </p>
    </form>
  );
}
Input supplies the visible label and helper text. Its value stays controlled by React. The save button is disabled for empty or whitespace-only names, and the form trims the name before displaying a confirmation. The status region announces that confirmation to assistive technology.
For a real account settings page, replace the in-memory update with your authenticated server action or API. Validate the name on the server and handle pending, success, and error states before treating the change as saved.
04. Compose the page
Render the form from a Server Component. The heading and surrounding content do not need to become Client Components just because the form is interactive.
import ProfileForm from "./profile-form";

export default function Page() {
  return (
    <main className="profile-page">
      <section className="profile-panel" aria-labelledby="profile-title">
        <p className="profile-eyebrow">RAYDEN UI / NEXT.JS</p>
        <h1 id="profile-title">Make yourself at home.</h1>
        <p className="profile-intro">
          A small profile form. A starting point for your next app.
        </p>
        <ProfileForm />
      </section>
    </main>
  );
}
Add the following app styles. These classes handle the page layout; Rayden’s stylesheet handles the input and button. For an existing app, merge them into your stylesheet rather than replacing its current rules.
body {
  margin: 0;
  background: #f5f4f2;
  color: #252322;
  font-family: system-ui, sans-serif;
}
.profile-page {
  min-height: 100svh;
  display: grid;
  place-items: center;
  padding: 32px 20px;
}
.profile-panel {
  width: min(100%, 520px);
  background: #fff;
  padding: clamp(24px, 5vw, 48px);
  border: 1px solid #e6e3df;
  border-radius: 24px;
  box-shadow: 0 16px 48px #25232208;
}
.profile-eyebrow { color: #765c4c; font-size: 11px; letter-spacing: .12em; }
.profile-panel h1 { font-size: clamp(28px, 5vw, 36px); line-height: 1.15; letter-spacing: -.04em; margin: 16px 0; }
.profile-intro { color: #66615e; line-height: 1.6; margin-bottom: 28px; }
.profile-form { display: grid; gap: 20px; }
.profile-actions { display: flex; }
.profile-status { min-height: 44px; margin: 0; font-size: 14px; line-height: 1.6; color: #365d46; }
05. Run it and check the behaviour
Start the development server with npm run dev and open http://localhost:3000 (or the address printed in your terminal). Enter a name, then select Save display name.
- An empty name leaves the save button disabled.
- A valid name produces a confirmation below the button.
- Editing the name clears the previous confirmation.
- Reloading resets the form, because this example has no persistent storage.
Before deploying your own app, check its production build:
npm run build
npm start
Common questions
Why do the components look unstyled?
Check that the root layout imports @raydenui/ui/styles.css. Restart the development server after installing the package. If the import is present, inspect your app’s global CSS for broad rules that override component colours, borders, or spacing.
Do I need Tailwind CSS?
No. This example uses the package’s compiled stylesheet and ordinary CSS. If you want Tailwind utilities in your own app, follow the separate Tailwind setup guide.
Why am I getting an event handler or useState error?
Put "use client" at the top of the file that defines the interactive form. Keep its event handlers inside that client boundary. Do not pass ordinary callback functions from a Server Component into the form.
Does this work with the Pages Router?
This guide is written for App Router. In a Pages Router project, global CSS belongs in pages/_app.tsx; its routing and layout files differ. Follow the Next.js Pages Router CSS instructions for that setup.
Keep building
Want your coding assistant to work from Rayden’s component contracts? Follow the Rayden AI setup guide to connect the MCP companion and validate proposed props.
Explore the Button API, Input API, and design tokens when you’re ready to adapt the form to your product.
For the framework concepts used here, see Next.js’s official guides to installation, Server and Client Components, and CSS.
Get the complete example